Beginner's Guide to Making Country Wine
Welcome to the fascinating world of country winemaking. Making your own wine at home is a rewarding hobby that has been enjoyed for centuries. With only a few pieces of equipment and some basic ingredients, you can produce wines that are every bit as enjoyable as many commercial bottles.
One of the great advantages of country winemaking is that the process is remarkably similar regardless of whether you are making wine from fruit, flowers, vegetables, herbs or tea. Once you understand the basic method, you'll be able to make almost every recipe in this encyclopaedia with confidence.
Country winemaking is a hobby that combines gardening, foraging, science and creativity. Whether you're making your first bottle of elderflower wine or experimenting with unusual fruits and flowers, every batch is an opportunity to learn something new.
The recipes in this encyclopaedia have been designed to guide you through every stage of the process. Take your time, enjoy the journey and, above all, have fun creating wines that are uniquely your own.
Essential Equipment
You don't need expensive equipment to make excellent wine. The following items are all you need to begin making a 1 UK gallon (4.5 litre) batch.
Fermentation Bucket (5–10 litre)
A food-grade fermentation bucket is used during the first stage of fermentation when the yeast is at its most active. A lid is recommended to keep dust and insects out while allowing gases to escape.
Demijohn (1 UK Gallon / 4.5 Litres)
A glass or PET plastic demijohn is used for the secondary fermentation and clearing stages.
Airlock and Bung
An airlock allows carbon dioxide produced during fermentation to escape while preventing air, bacteria and wild yeasts from entering the wine.
Hydrometer and Trial Jar
A hydrometer measures the sugar content of your wine before and after fermentation. This allows you to estimate the finished alcohol content and confirm when fermentation has completed.
Siphon Tube
A food-grade siphon makes it easy to transfer wine between containers without disturbing the sediment.
Sterilising Solution
Cleanliness is one of the most important parts of successful winemaking. Always sterilise every piece of equipment before use.
Long Stirring Spoon
A food-grade plastic or stainless steel spoon is ideal for dissolving sugar and stirring the must.
Measuring Jug
Useful for measuring water and other liquids accurately.
Kitchen Scales
Accurate weighing of sugar, fruit and additives helps produce consistent results.
Thermometer
Most wine yeasts perform best between 18°C and 22°C.
Fine Muslin Bag or Jelly Bag
Used for straining flowers, herbs and fruit pulp.
Bottles and Corks
Standard 750 ml wine bottles with corks or screw caps are suitable for storing finished wine.
Essential Ingredients
Most country wines use very similar ingredients.
-
Sugar
-
Wine yeast
-
Yeast nutrient
-
Water
-
Citric acid or fresh lemons
-
Campden tablets (optional)
-
Pectic enzyme (for many fruit wines)
-
Wine tannin (optional for some recipes)
Understanding the Winemaking Process
Although recipes vary, almost every Country Wine follows the same basic steps.
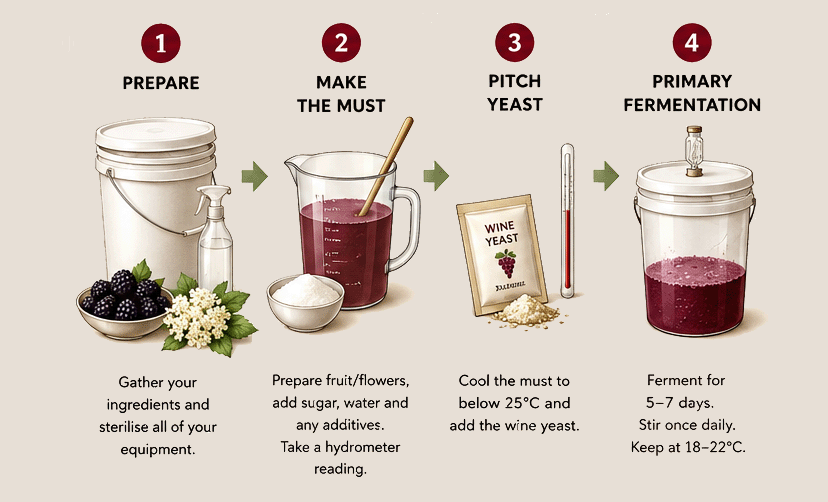
Step 1 – Prepare the Main Ingredient
Wash or prepare the fruit, flowers, herbs or vegetables according to the recipe.
Some ingredients are crushed, others are steeped in hot water, while fruits are often chopped or frozen first to release their juice.
Step 2 – Make the Must
The unfermented wine is known as the must.
Typically this involves:
At this stage, take a hydrometer reading and record the Original Gravity (OG).
Step 3 – Pitch the Yeast
Allow the must to cool to below 25°C.
Add the wine yeast according to the manufacturer's instructions.
The yeast will begin converting sugar into alcohol and carbon dioxide.
Step 4 – Primary Fermentation
Primary fermentation usually lasts 5 to 7 days.
During this stage:
-
Keep the wine at 18–22°C.
-
Stir once each day if the recipe calls for it.
-
Cover the fermentation bucket loosely or fit the lid.
This is the most active part of fermentation.
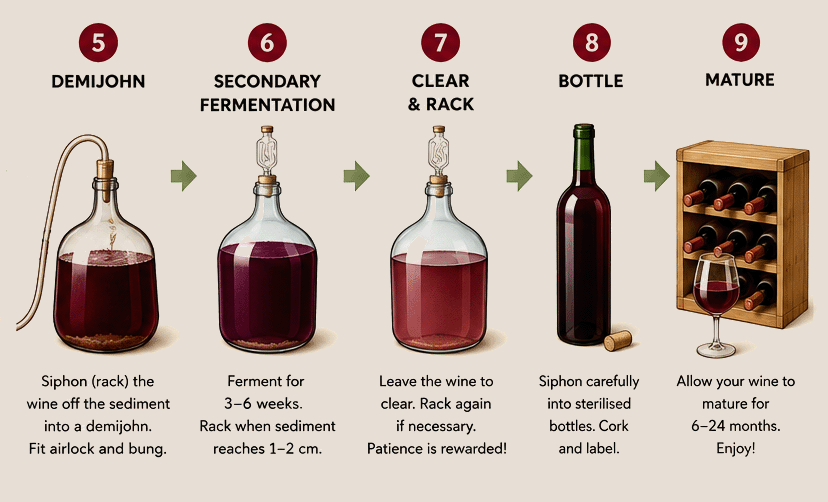
Step 5 – Transfer to a Demijohn
After the vigorous fermentation slows, siphon the wine into a sterilised demijohn.
Fit an airlock and bung.
Try to leave as much sediment behind as possible.
Step 6 – Secondary Fermentation
Secondary fermentation usually lasts 3 to 6 weeks.
The wine ferments much more slowly while gradually becoming clearer.
Rack the wine whenever a layer of sediment around 1–2 cm deep has formed.
Use your hydrometer.
Most country wines finish between 0.995 and 1.000.
When two readings taken several days apart are identical, fermentation has finished.
Step 7 – Clear the Wine
Leave the wine somewhere cool until it becomes brilliantly clear.
Patience is rewarded.
Many wines improve enormously during this stage.
Step 8 – Bottle the Wine
Once completely clear:
-
Sterilise bottles.
-
Siphon carefully.
-
Cork or cap securely.
-
Label every bottle with:
-
Wine name
-
Bottling date
-
Batch number
-
Alcohol content
Step 9 – Mature the Wine
Almost every country wine improves with age.
As a general guide:
-
Light flower wines: 6–12 months
-
Fruit wines: 9–18 months
-
Strong berry wines: 12–24 months
-
Dessert and fortified wines: 2 years or more
Patience almost always produces a better wine.
Your First 1 Gallon Batch
If you've never made wine before, choose a simple recipe such as:
These recipes are forgiving, inexpensive and consistently produce excellent results.
Don't worry if your first wine isn't perfect. Every batch teaches something new, and before long you'll develop your own techniques and preferences.
Top Tips for Success
-
Clean and sterilise all equipment before use.
-
Use fresh, high-quality ingredients.
-
Measure carefully.
-
Keep accurate notes for every batch.
-
Avoid exposing wine to air unnecessarily.
-
Be patient—good wine cannot be rushed.
-
Taste and learn from every batch.
Common Beginner Mistakes
-
Poor sterilisation.
-
Fermenting at temperatures that are too high or too low.
-
Bottling before fermentation has completely finished.
-
Moving the demijohn too often.
-
Ignoring hydrometer readings.
-
Opening bottles too early.
Frequently Asked Questions
Do I really need a hydrometer?
Yes. A hydrometer is one of the most useful tools a winemaker can own. It tells you how much sugar is present, helps estimate alcohol content and confirms when fermentation has finished.
Can I use ordinary baking yeast?
No. Baking yeast is designed for bread, not wine. Always use a good-quality wine yeast for the best flavour, alcohol tolerance and reliability.
How long before I can drink my wine?
Most country wines are drinkable after six to nine months, but many improve dramatically after a year or more.
Why is my wine cloudy?
Young wine is often cloudy. Given time, most wines clear naturally. Pectic enzyme, careful racking and patience will usually produce a bright, clear wine.
Is homemade wine safe?
Yes, provided good hygiene is maintained, suitable ingredients are used and fermentation is allowed to finish completely.
Happy Winemaking!
|